How To Make Decorative Ice
Gems
I stumbled upon this article while online on Facebook a few weeks ago. I thought it was an increible idea, and something to look forward to for the upcoming winter season. After doing some research I found a great site that has step by step instructions on how to make these wonderful ice gems. The following is a list what items that you need and also step by step instrcutions to get you on your way to creating.
What You'll Need
- Water
- Balloons
- Food coloring
- Two days to freeze
- Outdoor Temps < 25ºF / -4ºC
Source: faceless39
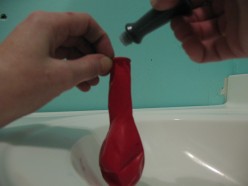 Step 1: Food Coloring
Gently open the balloon with one hand and drop 3-4 drops of food coloring into the dry balloon. Try not to get this stuff on your hands; it does stain skin.
Note: Food coloring is affected by cold, and will therefore settle to one spot in your ice gem. There will not be a uniform color. That said, color adds interest and depth to your creation.
This step certainly isn't necessary, but does add a bit of color in the center of the ice gem. Crystal clear gems are absolutely beautiful as well, so I've been making multiples of each.
Step 1: Food Coloring
Gently open the balloon with one hand and drop 3-4 drops of food coloring into the dry balloon. Try not to get this stuff on your hands; it does stain skin.
Note: Food coloring is affected by cold, and will therefore settle to one spot in your ice gem. There will not be a uniform color. That said, color adds interest and depth to your creation.
This step certainly isn't necessary, but does add a bit of color in the center of the ice gem. Crystal clear gems are absolutely beautiful as well, so I've been making multiples of each.
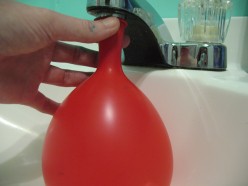 Step 2: Water
Secure the lip of the balloon over the lip of the kitchen or bathroom tap. Hold the lip of the balloon secure with one hand while you hold the weight of the balloon with the other hand.
Fill the balloon with the coldest water you can get from your tap, and fill it slowly. Make sure not the overfill the balloon or you'll get an explosion of colored water all over the place.
Tie the balloon like you'd tie a normal water balloon. Don't worry if there's an air space at the top; it won't matter.
Step 2: Water
Secure the lip of the balloon over the lip of the kitchen or bathroom tap. Hold the lip of the balloon secure with one hand while you hold the weight of the balloon with the other hand.
Fill the balloon with the coldest water you can get from your tap, and fill it slowly. Make sure not the overfill the balloon or you'll get an explosion of colored water all over the place.
Tie the balloon like you'd tie a normal water balloon. Don't worry if there's an air space at the top; it won't matter.
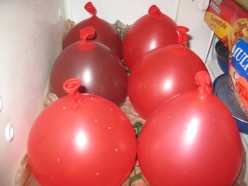 Step 3: Freeze
If you can freeze these outside, that's great and is very convenient. Make sure to put something down on the ground underneath all your balloons. Though unlikely if handled correctly, your balloons can burst or even stick to the ground or bottom of the freezer. I use plastic grocery bags outdoors and also inside the freezer.
Make sure balloons rest on a flat surface, since you want the ice gems to have a flat bottom.
Freeze for a day and then gently flip the balloons onto their side to continue freezing. They form ice toward the top of the balloon first, and flipping them onto their sides seems to speed up the freezing process of the bottom half. Continue freezing for at least another day and night to ensure the core is completely frozen.
After two days, check the balloon by gently shaking it back and forth. If you feel liquid sloshing around inside the gem, or see an air bubble moving around inside, put it back into the freezer or outside for another day. There's nothing worse than getting this far, only to have your gem burst open.
Step 3: Freeze
If you can freeze these outside, that's great and is very convenient. Make sure to put something down on the ground underneath all your balloons. Though unlikely if handled correctly, your balloons can burst or even stick to the ground or bottom of the freezer. I use plastic grocery bags outdoors and also inside the freezer.
Make sure balloons rest on a flat surface, since you want the ice gems to have a flat bottom.
Freeze for a day and then gently flip the balloons onto their side to continue freezing. They form ice toward the top of the balloon first, and flipping them onto their sides seems to speed up the freezing process of the bottom half. Continue freezing for at least another day and night to ensure the core is completely frozen.
After two days, check the balloon by gently shaking it back and forth. If you feel liquid sloshing around inside the gem, or see an air bubble moving around inside, put it back into the freezer or outside for another day. There's nothing worse than getting this far, only to have your gem burst open.
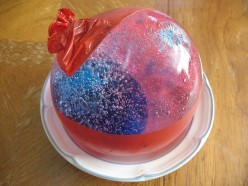 Step 4: Unwrap
Now for the fun part! It's okay to unwrap your gems indoors, but make sure they're not by a heater or out in the warm air for too long.
They start to melt fast, even with body heat, so I take one at a time and place it on a steady, cool surface. I use the kitchen table and a regular-sized soup bowl. Leave the other ones outside or in the freezer until you're ready to unwrap them.
Balance the gem in a bowl and gently remove the outer balloon coating, doing your best not to touch the surface of the gem (which instantly starts it melting.) The balloon and gem might have sharp, icy edges, so be careful. Soon you'll be able to see your very own decorative ice gem for the first time. Each one is different and unique. What will you find?
After each one is unwrapped I stick it back in the bowl and either into the freezer or outside. Leaving them in the bowl makes transport easy and won't get your hands as cold.
Step 4: Unwrap
Now for the fun part! It's okay to unwrap your gems indoors, but make sure they're not by a heater or out in the warm air for too long.
They start to melt fast, even with body heat, so I take one at a time and place it on a steady, cool surface. I use the kitchen table and a regular-sized soup bowl. Leave the other ones outside or in the freezer until you're ready to unwrap them.
Balance the gem in a bowl and gently remove the outer balloon coating, doing your best not to touch the surface of the gem (which instantly starts it melting.) The balloon and gem might have sharp, icy edges, so be careful. Soon you'll be able to see your very own decorative ice gem for the first time. Each one is different and unique. What will you find?
After each one is unwrapped I stick it back in the bowl and either into the freezer or outside. Leaving them in the bowl makes transport easy and won't get your hands as cold.
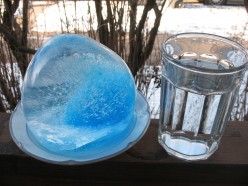 Step 5: Secure Outdoors
Your decorative ice gems should be secured to an outdoor surface to prevent the wind or wild animals (neighborhood kids) from disturbing them. This is very simple and quick to do.
Get a glass of cold water and take it outside with you wherever you want to place your ice gem. Pour half the glass of water onto the surface where you'd like your gem to stay.
Place the flat side of the ice gem onto the pool of cold water. Pour the remaining half cup of water over the top of the gem. This will freeze the gem into place, and will be very difficult to move.
In a few hours, the ice will get more clear, and will permanently set. If it gets snowed on or dirtied, just pour another glass of cold water over it to rinse it off. These layers add a clarity to your ice gems over time, makes them more crystal clear, and ensures they remain fastened to their spot.
If you do want to remove your ice gem, simply pour a little bit of hot water around the base until it comes right off. You can also trickle hot water over the top of the gems to make crazy patterns and pockets, then fill with colored water and let them freeze again.
Step 5: Secure Outdoors
Your decorative ice gems should be secured to an outdoor surface to prevent the wind or wild animals (neighborhood kids) from disturbing them. This is very simple and quick to do.
Get a glass of cold water and take it outside with you wherever you want to place your ice gem. Pour half the glass of water onto the surface where you'd like your gem to stay.
Place the flat side of the ice gem onto the pool of cold water. Pour the remaining half cup of water over the top of the gem. This will freeze the gem into place, and will be very difficult to move.
In a few hours, the ice will get more clear, and will permanently set. If it gets snowed on or dirtied, just pour another glass of cold water over it to rinse it off. These layers add a clarity to your ice gems over time, makes them more crystal clear, and ensures they remain fastened to their spot.
If you do want to remove your ice gem, simply pour a little bit of hot water around the base until it comes right off. You can also trickle hot water over the top of the gems to make crazy patterns and pockets, then fill with colored water and let them freeze again.